Exterior Painting Prep in Edmonds: Why Pressure Washing, Scraping, and Priming Matter
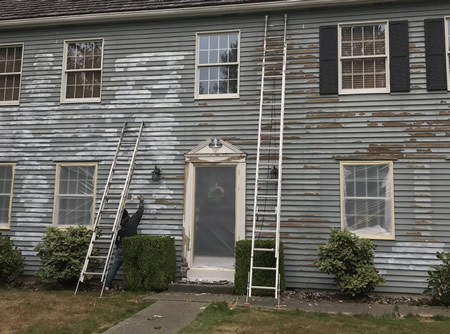
A quality exterior paint job is not defined by the paint alone. It is defined by the preparation before the paint ever touches the siding.
For homeowners in Edmonds, exterior painting prep is especially important because homes are exposed to Pacific Northwest weather, moisture, shaded areas, moss, mildew, and seasonal temperature changes.
A fresh coat of paint may look good at first, but if the surface is not prepared properly, the paint can peel, bubble, crack, or fail much earlier than expected.
This guide explains why pressure washing, scraping, sanding, caulking, and priming matter when painting the exterior of a home in Edmonds.
Why Prep Work Matters More Than Most Homeowners Realize
Exterior paint needs a clean, stable, dry surface to bond properly.
If the surface has dirt, mildew, loose paint, chalking, failing caulk, or exposed wood, the new paint will not perform the way it should.
Poor prep can lead to:
- peeling paint
- bubbling
- uneven finish
- early fading
- moisture problems
- exposed siding damage
- expensive repainting sooner than expected
This is why the cheapest exterior paint quote is not always the best value.
A lower price often means less preparation.
Edmonds Weather Makes Prep More Important
Homes in Edmonds deal with challenging exterior conditions.
Common local factors include:
- frequent rain
- moisture from Puget Sound
- shaded siding
- moss and mildew
- seasonal temperature changes
- damp trim and siding
- coastal air exposure
These conditions can cause paint to break down faster if surfaces are not properly cleaned and prepared.
Exterior painting in Edmonds should be treated as a protection system, not just a color change.
Step 1: Pressure Washing
Pressure washing is usually one of the first steps in exterior painting prep.
It helps remove:
- dirt
- dust
- mildew
- algae
- loose debris
- spider webs
- surface contaminants
Paint does not bond well to dirty surfaces. Washing the home creates a cleaner base for primer and paint.
However, pressure washing must be done carefully. Too much pressure can damage siding, force water behind surfaces, or rough up wood fibers.
A professional contractor uses the right pressure, distance, and technique based on the siding material.
Step 2: Allowing the Surface to Dry
After washing, the home needs time to dry before scraping, priming, or painting.
This step is often rushed.
In Edmonds, drying time matters because shaded areas and older siding can hold moisture longer than expected.
Painting over damp siding can cause:
- poor adhesion
- bubbling
- peeling
- trapped moisture
- early paint failure
A professional painter pays attention not just to the weather forecast, but also to actual surface conditions.
Step 3: Scraping Loose Paint
Any loose or failing paint must be removed before applying new paint.
Scraping helps eliminate:
- peeling paint
- flaking edges
- unstable coatings
- areas where paint has lost adhesion
If new paint is applied over failing paint, the old layer can continue peeling underneath, taking the new paint with it.
Scraping is labor-intensive, but it is one of the most important steps in a durable exterior paint project.
Step 4: Sanding Rough Edges
After scraping, sanding helps smooth rough transitions between old paint and exposed surfaces.
This improves:
- final appearance
- paint adhesion
- surface consistency
- durability
Sanding helps prevent the finished project from looking patchy or rough.
It also helps primer and paint bond better to the prepared area.
Step 5: Repairing Damaged Siding or Trim
Painting over rotten or damaged siding is a mistake.
Before painting, damaged areas should be repaired or replaced, which may require professional siding repair or replacement.
Common repairs may include:
- replacing rotten trim
- repairing damaged siding boards
- fixing cracked fascia
- filling minor imperfections
- addressing exposed wood
- correcting failing caulk lines
Paint can protect sound surfaces, but it cannot fix rotten material.
If damaged areas are ignored, the paint job may fail quickly and the repairs will become more expensive later.
Step 6: Caulking Gaps and Seams
Caulking is important because it helps seal gaps where water can enter.
Common areas that need caulking include:
- trim joints
- window trim
- door trim
- siding transitions
- corner boards
- gaps around exterior details
Quality caulking helps reduce moisture intrusion and creates a cleaner finished appearance.
Old, cracked, or missing caulk should be removed and replaced before painting.
Step 7: Priming Bare or Exposed Surfaces
Primer helps paint bond properly and protects exposed material.
Primer is especially important on:
- bare wood
- repaired siding
- scraped areas
- stained areas
- weathered surfaces
- areas with previous paint failure
Skipping primer can cause uneven finish, poor adhesion, or early peeling.
The correct primer depends on the surface and condition of the home.
Step 8: Choosing the Right Paint System
Prep work and paint product need to work together.
A professional exterior paint system may include:
- cleaning
- scraping
- sanding
- repairs
- caulking
- primer
- finish coats
The paint should be selected based on siding type, exposure, color, and local weather conditions.
In Edmonds, high-quality exterior paint designed for moisture resistance is usually worth the investment.
What Happens When Prep Work Is Skipped?
When prep work is rushed or skipped, homeowners may notice problems within a few seasons.
Common issues include:
- peeling around trim
- bubbling on siding
- paint failure on sunny or wet sides
- mildew returning quickly
- cracking caulk
- exposed wood
- uneven color
At that point, fixing the problem often requires more labor than if the prep had been done correctly the first time.
Cheap paint jobs often become expensive when they need to be redone early.
How Prep Work Affects Cost
Prep work is one of the biggest reasons exterior painting costs vary.
A home in good condition costs less to paint than a home with peeling paint, damaged siding, rotten trim, or heavy mildew.
Prep increases cost because it takes time and labor.
But it also increases the lifespan of the paint job.
A quality exterior paint job should not be judged only by price. It should be judged by what is included in the preparation process.
Why Professional Exterior Painting Matters
Professional exterior painting includes more than applying paint.
A professional contractor helps with:
- surface inspection
- pressure washing
- scraping
- sanding
- repairs
- caulking
- priming
- paint selection
- masking and protection
- clean application
KG Construction focuses on exterior painting and related exterior renovations with proper preparation, quality materials, and clean execution. The goal is to protect the home and deliver a finish that lasts in Edmonds weather conditions.
Proper Exterior Painting Prep Protects Your Edmonds Home
Exterior painting prep is the difference between a paint job that lasts and one that fails early.
For Edmonds homes, pressure washing, scraping, sanding, repairs, caulking, and priming are critical because of Pacific Northwest moisture and weather exposure.
A quality paint job is built before the finish coat goes on. Proper preparation protects siding, improves adhesion, and helps the home look better for years.
Planning an Exterior Painting Project in Edmonds?
If you’re considering exterior painting and want the job done with proper prep, durable materials, and clean execution, we’d be happy to help.
Contact KG Construction today to schedule a free on-site estimate and start planning your exterior painting project.
KG Construction provides exterior painting services in Edmonds, Mukilteo, Bellevue, Kirkland, Mercer Island, Woodinville, Kenmore, and Mill Creek.
Start Your Remodeling Project Today Contact Our General Contracting Experts In Edmonds Today!